Think about the last time you got thick, wet mud all over your hands while working out in the garden. Would you grab a dry sheet of paper towel, wipe it around your skin, and call it clean? Absolutely not. You would head straight for the garden hose or the sink to wash it away with water.
Yet, for decades, we have relied entirely on dry paper for our most sensitive daily bathroom hygiene. It’s an antiquated habit that uses excessive resources and often leaves much to be desired in terms of true cleanliness.
Over my ten-plus years as a home improvement contractor, I have renovated hundreds of bathrooms. While clients frequently ask me about high-end tile styles or luxury quartz countertops, the single most life-changing, cost-effective upgrade I ever install is a premium handheld bidet sprayer. It is a minor plumbing addition that completely shifts your daily comfort while upgrading your home’s overall sanitary infrastructure. Let’s look at how to select, install, and seamlessly integrate this game-changing fixture ourselves.
The Physics of Fluid Control: Understanding the Sprayer Ecosystem
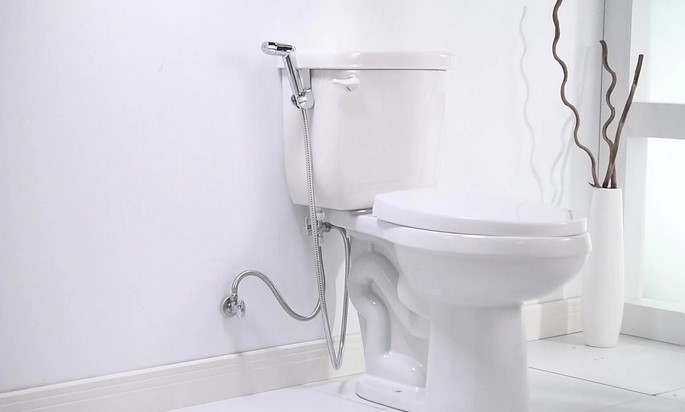
To an amateur, a handheld bidet sprayer looks just like the spray wand attached to your kitchen sink. However, the internal engineering operates under much higher stakes. A kitchen sink sprayer only holds water pressure when you turn on the main faucet dial. A bathroom bidet attachment, by contrast, is directly connected to your home’s live water supply line.
The Power of the T-Valve
The absolute heart of any high-quality bidet system is a heavy-duty component called the T-valve (or T-adapter). This solid brass valve splits the main water flow coming out of your bathroom wall shut-off valve. One path sends water straight up into the toilet tank to refill the flapper mechanism, while the secondary path channels water into your bidet’s flexible hose line.
Analogi: The Dam Gates
Think of your home’s plumbing system like a roaring river, and the T-valve as a high-tech dam gate. If you leave that gate open 24/7 without a secondary manual shut-off control, the constant hydrostatic pressure from your municipal water grid forces itself directly against the tiny rubber seals inside your handheld sprayer wand. Over time, that continuous pressure will wear down the seals, inevitably causing a silent water leak onto your bathroom floor.
Selecting Your Rig: Material Specifications and Configurations
When shopping for a handheld bidet sprayer, ignore the cheap $15 plastic kits you find online. They are a ticking time bomb for water damage. You want to focus on high-durability materials that match your existing bathroom aesthetic.
+-----------------------------------------------------------------------+
|                    BIDET MATERIAL CONFIGURATIONS                      |
+---------------------------+-------------------------------------------+
| ABS Plastic (Chrome-Clad) | Budget-friendly, prone to thread stripping|
+---------------------------+-------------------------------------------+
| Solid Brass               | Extreme durability, corrosion-resistant   |
+---------------------------+-------------------------------------------+
| 304 Stainless Steel       | Industrial grade, scratch-resistant, sleek|
+---------------------------+-------------------------------------------+
1. Solid Brass Components
In my field experience, solid brass remains the undisputed champion of plumbing fixtures. Brass naturally resists mineral scaling, handles extreme water pressure changes beautifully, and won’t rust out over decades of exposure to high bathroom humidity.
2. 304 Stainless Steel
If you prefer a clean, sleek, industrial aesthetic, opt for a brushed 304 stainless steel wand. It offers incredible tensile strength and stands up to harsh bathroom chemical cleaners without tarnishing.
3. Braided Polymer vs. Metal Hoses
Look closely at the flexible hose included in the kit. Avoid rigid plastic hoses that coil up tightly like old telephone cords; they are frustrating to manipulate. Insist on a high-pressure, explosion-proof hose lined with an internal EPDM rubber core wrapped in a braided stainless steel exterior sleeve.
Step-by-Step Blueprint for a Leak-Free DIY Installation
You do not need to pay a professional plumber hundreds of dollars to implement this sanitary upgrade. It is an ideal weekend project for a beginner or intermediate DIYer that takes less than thirty minutes if you follow this structured workflow.
       [ TOILET TANK BASE ]
               ||
        [ METAL T-VALVE ]  <===(Connects to Bidet Hose)
               ||
    [ FLEXIBLE SUPPLY LINE ]
               ||
      [ WALL SHUT-OFF VALVE ]
Step 1: Isolate the Water Supply
Locate the oval chrome shut-off valve coming out of the wall beneath your toilet tank. Turn it clockwise until it stops completely to isolate the water. Flush the toilet and hold the lever down until the tank is completely drained of water.
Step 2: Detach the Supply Line
Place a small bucket or towel beneath the connection point under the toilet tank to catch any residual water. Unscrew the existing flexible supply line from the threaded plastic fill-valve shank protruding from the bottom of the toilet tank.
Step 3: Insert the T-Valve Architecture
Ensure the rubber sealing washer is nested perfectly inside the top female threads of your new brass T-valve. Thread the T-valve directly onto the bottom of your toilet tank fill-valve by hand. Do not use heavy wrenches here, as over-tightening can easily crack the toilet tank’s plastic fill-valve assembly. Hand-tighten it firmly, plus an extra quarter-turn with a pair of adjustable pliers.
Step 4: Reconnect and Link the Wand
Attach your home’s original water supply line to the bottom threads of the T-valve. Next, connect the braided stainless steel bidet hose to the side outlet of the T-valve, and attach the other end directly to your handheld bidet sprayer wand. Mount the holster bracket either directly over the edge of the toilet tank rim or screw it into a nearby drywall stud.
What the Glossy Instruction Manuals Leave Out
The Static Hydrostatic Pressure Trap
Most manufacturers include a tiny note in their manuals advising you to turn off the T-valve lever after every single use. Homeowners almost always ignore this rule because it seems inconvenient. However, if a sudden water spike occurs in your city grid overnight while you are asleep, an open T-valve leaves your bidet hose completely vulnerable to bursting. Make it an unshakeable habit to flip that small T-valve lever down when you finish your routine. It completely takes the pressure off the hose, giving you absolute peace of mind.
-
The Thread Sealant Mistake: Do not wrap Teflon plumbers’ tape around connections that utilize a built-in black rubber washer. The rubber washer is engineered to compress and create a watertight seal naturally. Adding Teflon tape to these specific configurations actually deforms the washer, creating a direct path for water to spray out.
-
Temperature Calibration: Standard bidet attachments tap directly into the cold-water line feeding your toilet. While this is incredibly refreshing in tropical or warm climates, it can be a shocking surprise during a freezing northern winter. If you are sensitive to cold water, look into upgrading to a dual-temperature thermostatic mixing valve kit, which pulls warm water from your nearby bathroom sink vanity supply line.
Conclusion: Upgrade Your Private Sanctuary
Taking control of your bathroom’s sanitary infrastructure with a premium handheld bidet sprayer is one of the smartest, high-yield DIY moves you can make. By understanding the mechanical role of your T-valve, investing in solid brass or 304 stainless steel components, and building the habit of shutting down the water line after use, you unlock a superior standard of personal cleanliness while saving thousands on paper products over time.
Are you getting ready to upgrade your bathroom layout with a bidet accessory this weekend? What specific plumbing configurations or concerns do you have about your existing toilet line setup? Drop your thoughts or project questions in the comments below, and let’s get your bathroom flowing perfectly!
