You have a patio full of hungry guests, the steaks are seasoned to perfection, and you’ve just spent forty-five minutes hovering over a pile of stubborn briquettes that refuse to catch. You’ve squeezed half a bottle of lighter fluid onto the pile, creating a chemical fireball that smells more like a gas station than a gourmet kitchen, yet the center of the pile is still stone cold. This is the “charcoal trap” that ruins thousands of cookouts every year—the agonizing wait for a consistent heat source.
In my twelve years of managing outdoor kitchen builds and mastering the art of the perfect sear, I’ve realized that the greatest barrier to charcoal grilling isn’t the cost of the grill; it’s the logistics of the fire. I stopped using lighter fluid back in 2014, and I’ve never looked back. The secret to professional-grade Operational Culinary Efficiency lies in a simple, low-tech cylinder of steel: the Charcoal Grill Chimney.
The Physics of the Stack Effect: Why It Works
To understand why a Charcoal Grill Chimney is superior to any other ignition method, you have to understand the “Stack Effect” (or Chimney Effect). In a typical pile of charcoal, oxygen struggles to reach the center. Fire needs three things: fuel, heat, and oxygen. When you pile coals in a pyramid, you are effectively suffocating the very fire you’re trying to start.
The chimney solves this by forced convection. It is a vertical tube that holds the fuel in a concentrated column. By lighting a small fire at the very bottom, the heat rises through the cylinder, creating a vacuum that pulls fresh, oxygen-rich air through the bottom vents. This creates a localized “forge” environment.
The Jet Engine Analogy
Think of a Charcoal Grill Chimney like a jet engine for your backyard. A standard pile of charcoal is like a campfire—it’s pretty, but it’s inefficient and slow. The chimney takes that same energy and focuses it into a high-velocity stream of heat. Within fifteen minutes, the physical laws of thermodynamics do the work that lighter fluid and a hand fan couldn’t do in an hour.
Anatomy of a High-Performance Charcoal Grill Chimney
Not all chimneys are built for the long haul. When I’m scouting equipment for a client’s outdoor refurbishment, I look for specific mechanical features that ensure safety and longevity.
1. Material and Heat Shielding
I always recommend heavy-duty aluminized steel. It resists rust better than standard sheet metal and handles the extreme thermal expansion of a 1,000°F internal temperature. Most importantly, look for a high-quality heat shield between the cylinder and the handle. I’ve seen cheap models where the handle melts or becomes too hot to touch even with a glove—that’s a major safety liability.
2. Capacity and Venting
A standard chimney should hold about 5 to 6 pounds of briquettes. The “ventilation logistics” are also critical. Look for a model with a large number of holes at the base. If the intake is restricted, the “stack effect” won’t initiate properly, and you’ll end up with “stalling” fire.
3. The “Cone” Bottom vs. The Flat Grate
In my experience, chimneys with a conical bottom grate perform 20% faster. The cone shape increases the surface area exposed to the flames from your starter material, igniting more coals simultaneously rather than waiting for the fire to crawl from the bottom up.
Master the Logistics: A Step-by-Step Ignition Protocol
Achieving a perfect “ash-over” (when the coals are glowing red and covered in a fine gray ash) requires a specific sequence. If you rush the logistics, you end up with uneven heat zones.
-
Step 1: The Base Layer. Place two or three “fire starter” cubes or crumpled newspaper on the charcoal grate of your grill. Pro Tip: If using newspaper, drizzle a teaspoon of vegetable oil on the paper. It slows down the burn, giving the paper enough “dwell time” to actually ignite the charcoal.
-
Step 2: The Fill. Pour your Charcoal Grill Chimney full of lump charcoal or briquettes. I prefer lump charcoal for high-heat searing and briquettes for long, low-and-slow smoking sessions due to their uniform burn rate.
-
Step 3: The Ignition. Light the paper through the holes at the bottom of the chimney.
-
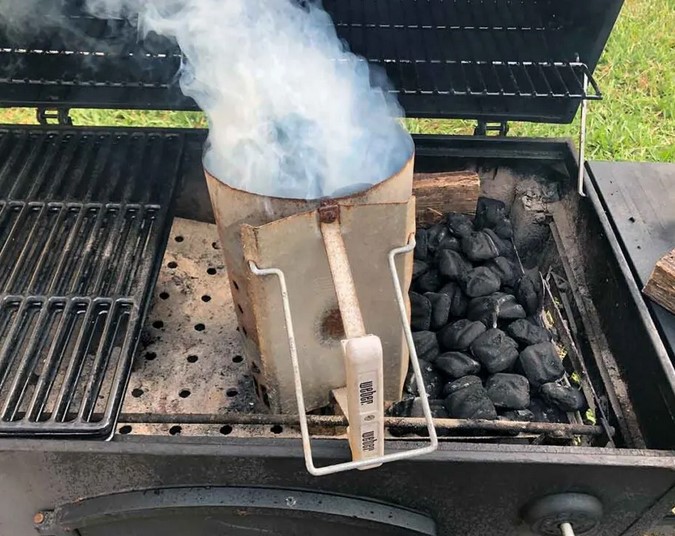
Step 4: The Wait. Do not touch the chimney for 15 to 20 minutes. You’ll know it’s ready when the coals at the very top are starting to turn gray and you see flames licking out of the top of the cylinder.
Expert Advice: The “Invisible” Flavor Benefit
The biggest reason I advocate for the Charcoal Grill Chimney isn’t just speed—it’s the purity of the culinary output.
Tips Pro: Lighter fluid is a petroleum-based product. When you use it, those chemical fumes permeate your food. Have you ever eaten a burger that had a weird, chemical aftertaste? That’s the lighter fluid. By using a chimney, the only things touching your meat are heat and hardwood smoke. It’s the difference between a “mechanical” flavor and an “authentic” one.
Never use a Charcoal Grill Chimney on a wooden deck or a plastic table. The bottom of the chimney becomes hot enough to ignite wood or melt high-density polyethylene (HDPE) within seconds. Always place it on the metal grate of your grill or a concrete paver while it’s doing its work.
Maintenance and Long-Term Durability
A well-made chimney can last five to seven years if you manage the logistics of storage.
-
Oxidation Management: Even aluminized steel will eventually succumb to rust if left in the rain. Charcoal ash is alkaline; when it gets wet, it becomes corrosive.
-
The “Clean Dump” Rule: After you pour the hot coals into your grill, give the chimney a sharp tap against a non-combustible surface to knock out any remaining ash.
-
Storage: Store it inside the grill (once cooled) or in a dry garage. If you leave it out in the humidity, the rivets will be the first thing to fail, and the handle will eventually snap off.
Summary: Scaling Your Outdoor Kitchen Efficiency
In the world of home improvement and outdoor living, we often look for the most expensive gadgets to improve our experience. But the Charcoal Grill Chimney proves that the best solution is often the simplest one. It’s an essential tool for anyone moving from “casual griller” to “culinary enthusiast.”
By mastering the stack effect and respecting the logistics of airflow, you cut your startup time in half, eliminate harmful chemicals from your diet, and ensure a perfectly even heat bed every single time you cook. It’s not just a tool; it’s a fundamental upgrade to your grilling workflow.
Are you still struggling with the “soot and smoke” of old-school lighting methods, or have you already made the switch to a chimney? If you’re having trouble getting your coals to ash-over consistently, drop a comment below—I’d love to help you troubleshoot your airflow and get that grill screaming hot!