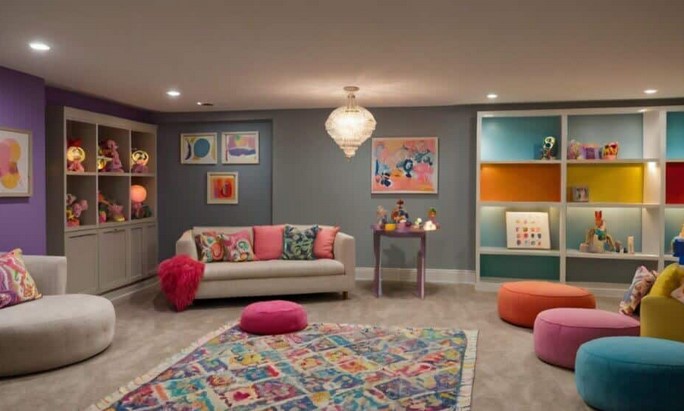
Picture this: It’s a rainy Tuesday, and your living room has officially been colonized by a sprawling empire of plastic bricks, half-finished puzzles, and a nomadic tribe of stuffed animals. You’re stepping over a miniature castle just to reach the coffee machine, and that’s when you look at the door leading to your dark, chilly, and underutilized basement. You realize that down there lies 500 square feet of untapped potential—a “forgotten frontier” that could save your sanity.
In my decade of transforming damp “dungeons” into vibrant family hubs, I’ve learned that a successful basement playroom setup isn’t just about throwing a colorful rug over concrete. It’s a strategic operation. Most homeowners treat the basement as a secondary thought, but if you approach it with the same technical rigor as a kitchen remodel, you don’t just create a play area; you significantly increase your home’s “habitable square footage” and market value.
I’ve stood in far too many basements where the drywall was crumbling from the bottom up because a DIYer ignored the “Basement Rule of Three”: Moisture, Light, and Air. Let’s make sure your project doesn’t become a cautionary tale.
The Foundation of Fun: Solving the “Sub-Grade” Physics
Before you buy a single toy bin, we have to talk about the physics of being underground. A basement is essentially a concrete bowl sitting in damp soil. If you don’t respect the hydrostatic pressure—the force of water pushing against your foundation—your beautiful playroom will smell like a wet gym locker within six months.
Think of your basement like a submarine hull. It’s not enough for it to look good on the inside; it has to be absolutely sealed from the outside environment. In my professional practice, I never start a basement playroom setup without a 48-hour calcium chloride test to check for vapor emission rates.
Moisture Barriers and Subflooring
Never install carpet or hardwood directly on concrete. I’ve seen $5,000 worth of flooring ruined by a minor “seepage” event that could have been prevented by a $300 investment in a dimpled polyethylene subfloor.
-
Vapor Barriers: These prevent moisture from migrating from the slab into your finish materials.
-
Inorganic Materials: Whenever possible, use metal studs instead of wood, and “paperless” mold-resistant drywall. If water ever does get in, these materials won’t provide a food source for mold.
Lighting the Cave: Advanced Illumination Strategies
The biggest psychological barrier to a basement is the feeling of being “underground.” In my experience, the difference between a room that feels like a bunker and one that feels like a sunroom is Color Rendering Index (CRI) and light layering.
The Three Layers of Basement Light
To achieve a professional basement playroom setup, you need to mimic the dynamics of natural sunlight:
-
Ambient Lighting: Recessed “can” lights are the industry standard here because they don’t eat into your precious ceiling height (headroom is everything in a basement!).
-
Task Lighting: Bright, focused LEDs over craft tables or LEGO stations.
-
Accent Lighting: This is the secret sauce. Using LED light strips in crown molding or behind “fake” window frames with frosted glass can trick the brain into thinking there is an external light source.
Pro Tip: Always aim for a color temperature between 3500K and 4000K (Cool White). Anything lower (warmer) will make the basement feel dingy, and anything higher (daylight) can feel clinical and harsh.
Thermal Comfort: Heating and Air Exchange
I often see parents complain that their kids don’t use the playroom in the winter. Usually, it’s because the floor is 55°F (13°C). Heat rises, meaning your basement is naturally the “cold sink” of the house.
The HVAC Challenge
Your existing furnace might have the capacity to heat the basement, but does it have the return air vents to circulate it? Without a return vent at floor level, the cold air stays trapped at your kids’ feet while the warm air clings to the ceiling.
-
Zoned Heating: Consider electric baseboard heaters or radiant floor heating for localized comfort.
-
Dehumidification: A built-in, dedicated dehumidifier tied into your floor drain is a non-negotiable component of a professional basement playroom setup. Aim to keep humidity levels between 30% and 50%.
Zoned Planning: Designing for “The Long Game”
A toddler needs a soft place to crawl; a ten-year-old needs a gaming station; a teenager needs a lounge. If you design specifically for a three-year-old, your investment has a “shelf life” of only a few years.
The “Swiss Army Knife” Approach:
-
Active Zone: High-durability flooring (like Luxury Vinyl Plank (LVP) or rubber tiles) for mini-gyms or indoor swings.
-
Quiet Zone: A carpeted nook with “built-in” bookshelves for reading and homework.
-
Storage Wall: Use the “Real Estate Footprint” wisely by installing floor-to-ceiling cabinetry. In the trade, we call this “hiding the chaos.”
Expert Advice: The “Hidden Warning” of Egress
This is the most critical part of this article. If you are creating a “habitable space” where children will spend hours, you must have a legal Egress Window.
I have walked away from jobs where homeowners refused to cut into their foundation for an egress window. In the event of a fire on the upper floors, the basement can become a trap. A legal egress window isn’t just a building code requirement; it’s a life-saving exit and a massive source of natural light that changes the entire “vibe” of the basement playroom setup.
Scannable Setup Checklist
-
Seal the Envelope: Check foundation for cracks and apply hydraulic cement.
-
Sub-Floor First: Use dimpled membranes (like DMX or DRIcore) before laying LVP.
-
Soundproofing: Install Rockwool insulation in the ceiling joists to dampen the sound of thundering footsteps from the kids above (and vice versa).
-
Power Play: Double the number of outlets you think you need. Gaming consoles, chargers, and smart TVs eat up “juice” fast.
-
Paint Selection: Use “Satin” or “Semi-gloss” finishes. Basements are prone to scuffs, and flat paint is a nightmare to clean.
Summary: From Storage to Sanctuary
Maximizing your real estate footprint through a strategic basement playroom setup is one of the highest-ROI projects you can undertake. It reclaims lost space, preserves the “adult” areas of the house, and provides a controlled environment for your children’s development.
By prioritizing moisture management, proper lighting, and safety egress, you move beyond a simple DIY fix and into the realm of professional home improvement. Remember: treat the basement with respect, and it will serve your family for decades.
Are you dealing with a “musty” smell in your basement currently, or are you starting with a completely dry slate? Let’s troubleshoot your foundation concerns in the comments below!
