Picture this: It’s 2:00 AM, and a torrential downpour is drumming against your roof. Instead of sleeping soundly, you’re standing by your bedroom window, watching a miniature waterfall cascade directly over the side of your gutters, bypassing the downspout entirely. By morning, that “scenic” waterfall has carved a trench in your expensive landscaping and is currently seeping toward your foundation.
In my decade of crawling onto scorched shingles and troubleshooting drainage disasters, I’ve seen this exact scenario play out hundreds of times. Homeowners often assume they need entirely new, expensive seamless gutters. But more often than not, the culprit isn’t the gutter size—it’s the pitch and the angle of the fascia. This is where the unsung hero of the roofing world comes in: Gutter Wedges DIY.
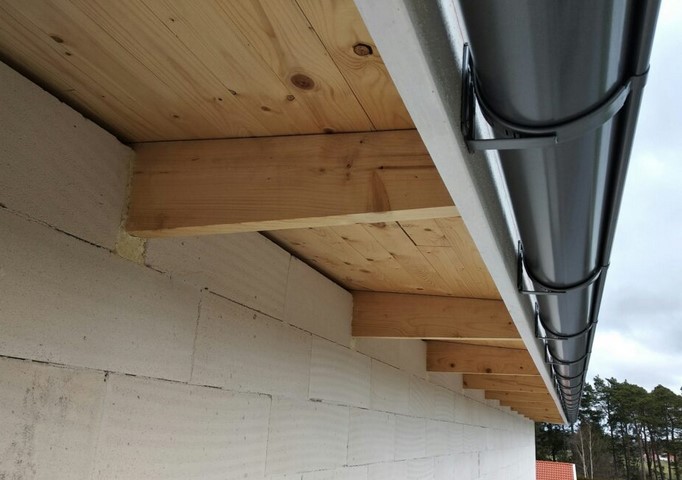
The Fascia Flaw: Why Your Gutters Are “Tipping”
Most people think gutters should be perfectly vertical. In reality, if your house has slanted or “canted” fascia boards (the wooden board your gutter attaches to), a standard installation will leave your gutters tilted.
Imagine trying to drink water out of a bowl that is tilted at a 45-degree angle; the water spills out long before the bowl is full. When your gutters tilt outward because of a sloped fascia, the capacity drops by as much as 50%. You aren’t just losing efficiency; you are inviting wood rot and foundation erosion.
I’ve spent years explaining to clients that a “straight” gutter on a “crooked” board is a recipe for disaster. This is why mastering a Gutter Wedges DIY project is the most cost-effective “hack” in the home improvement playbook.
What Exactly is a Gutter Wedge?
Think of a gutter wedge as a shim for your house. Just like you’d put a piece of folded cardboard under a wobbly table leg to level it out, a gutter wedge sits behind the gutter. It compensates for the angle of the fascia board, ensuring the gutter itself remains perfectly plumb (vertical).
These wedges are typically triangular, heavy-duty plastic or aluminum components. They allow the gutter to sit upright so that the water stays in the trough where it belongs, rather than sloshing over the front edge during a heavy storm.
The Technical Deep-Dive: Why Alignment Matters
When we talk about “Precision Water Management,” we are balancing two forces: Gravity and Volume.
-
Vertical Plumb: This ensures the “mouth” of the gutter is level. If the gutter leans forward, the water overflows. If it leans back, the water stays trapped against the fascia, leading to fascia rot and mold.
-
Longitudinal Pitch: This is the slope toward the downspout. Ideally, you want a 1/4-inch drop for every 10 feet of gutter run.
Without Gutter Wedges DIY, achieving both at the same time on a slanted fascia is mathematically impossible. You’ll be fighting the geometry of your own home.
Step-by-Step: Executing a Gutter Wedges DIY Project
If you’re a beginner or intermediate DIYer, don’t be intimidated. This is a logic puzzle, not rocket science. Here is how I’ve taught my apprentices to handle this for years.
1. The Snap-Test Diagnostic
Before buying materials, grab a ladder and a level. Place the level against the front face of the gutter. If the bubble isn’t centered and the gutter is leaning away from the house, look at the fascia board. Is it angled? If yes, you need wedges.
2. Measuring the “Canted” Angle
Fascia boards usually come in standard slopes (like 1×6 or 1×8 boards). You’ll need to measure the gap between the top of the gutter and the house when the gutter is held perfectly vertical. This tells you which size wedge to purchase.
3. Removal and Preparation
You don’t necessarily need to take the whole gutter system down. I usually recommend working in 10-foot sections.
-
Back out the existing gutter spikes or screws.
-
Clean the “hidden hangers” (the internal brackets).
-
Scrape away any old caulk or debris from the back of the gutter.
4. Inserting the Wedges
Slide the Gutter Wedges DIY behind the gutter at each hanger location. Most modern wedges are “universal,” meaning they can be adjusted or snapped to fit various angles.
-
Pro Tip: Use high-quality T-25 deck screws or specialized gutter screws rather than old-fashioned spikes. Spikes pull out over time; screws bite into the wood and stay there for a generation.
Selecting the Right Materials: Metal vs. Plastic
In my experience, the “cheapest” option often ends up being the most expensive in the long run.
-
Plastic/Polymer Wedges: These are great for coastal areas because they never rust or corrode. However, in regions with extreme heat, they can eventually become brittle.
-
Aluminum Wedges: These are the gold standard. They move with the gutter during thermal expansion and contraction. Since they are the same material as most gutters, you avoid galvanic corrosion (a chemical reaction that happens when two different metals touch).
The Hidden Value: Protecting Your Foundation
We aren’t just doing this for “alignment.” We are doing this to protect your most expensive asset: the foundation. When water overflows due to poor alignment, it pools at the base of your home.
In cold climates, this leads to frost heave, where the soil freezes and expands, cracking your concrete. In warmer, wet climates, it leads to hydrostatic pressure, which pushes water through the microscopic pores of your basement walls. A $50 Gutter Wedges DIY kit can literally save you a $15,000 foundation repair bill.
Expert Advice: While you are installing wedges, check your drip edge. The drip edge is the metal flashing that hangs over the fascia. If your new, leveled gutter doesn’t tuck under the drip edge, water will still run behind the gutter and rot your wood.
Common Pitfalls to Avoid
-
Over-Tightening: Don’t crank the screws so hard that you deform the gutter. It should be snug, not crushed.
-
Ignoring the Pitch: Leveling the gutter vertically is great, but don’t forget to maintain that slight downhill slope toward the downspout.
-
Skipping Hangers: Never place wedges more than 24 inches apart. Any wider and the gutter will sag under the weight of wet leaves or snow.
Maintenance: The “Set it and Forget it” Myth
Even with the most precise Gutter Wedges DIY installation, nature is relentless. I recommend a “Binocular Inspection” every spring and fall. Stand in your yard with a pair of binoculars and look at the line of your gutters. They should look like a crisp, straight line. If you see a “dip” or a “tilt,” a screw might have loosened, or a wedge might have shifted.
Mastering your home’s drainage isn’t about expensive gadgets; it’s about understanding how water behaves. By using Gutter Wedges DIY, you are correcting a fundamental architectural flaw and ensuring that every drop of rain is funneled exactly where it belongs.
Stop letting your slanted fascia dictate the health of your home. Get up there, check your angles, and align your gutters like a pro. Your foundation (and your wallet) will thank you.
Is your home dealing with a tricky roofline or an unusual fascia angle? I’d love to hear the specifics of your project. Would you like me to help you calculate the exact number of wedges and screws you’ll need for your gutter’s total linear footage?