Imagine you’re meticulously dicing a shallot for a Sunday reduction. You’re using your best chef’s knife, but there’s a frustrating shadow cast right over your knuckles. You lean in closer, squinting against the yellow glare of an outdated fixture, and—nick. A minor cut, but a major realization: your kitchen isn’t just poorly lit; it’s functionally blind.
In my ten years of tearing down walls and rewiring homes, I’ve noticed a recurring tragedy. Homeowners will spend $20,000 on Calacatta marble countertops only to illuminate them with a single, sad “boob light” in the center of the room. It’s like putting a Ferrari engine inside a pitch-black garage.
If you want a kitchen that actually works, you have to stop thinking about your kitchen ceiling light as a “decoration” and start viewing it as a critical piece of operational machinery.
The Anatomy of the Dark Kitchen: Why One Light Isn’t Enough
The biggest mistake I see beginners make is the “Single Source Fallacy.” Most people assume that if a light is bright enough, it will cover the whole room. In reality, a single central fixture turns you into a shadow-making machine. Every time you stand at a counter to work, your body blocks the light coming from behind you.
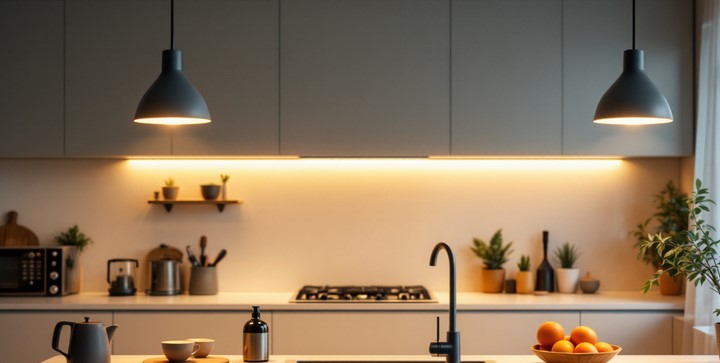
I like to compare kitchen lighting to a symphony orchestra. You don’t just want one loud drum (the center light); you need the violins (task lighting), the cellos (ambient lighting), and the flutes (accent lighting) to work together to create a harmonious environment. Without this “layered” approach, your kitchen will always feel flat, sterile, or dangerously dark in the corners.
Layering Your Kitchen Ceiling Light for Maximum Efficiency
To achieve a professional-grade setup, we need to integrate three distinct layers. This is where the technical “magic” happens.
1. Ambient Lighting: The Foundation
This is your general illumination. It fills the volume of the space so you don’t trip over the dishwasher. Usually, this is achieved through recessed “can” lights or a large central flush-mount.
-
The Pro Rule: Space your recessed kitchen ceiling light fixtures approximately 4 to 6 feet apart.
-
Technical Spec: Aim for a total of 30 to 40 foot-candles (a measure of light intensity) for general areas.
2. Task Lighting: The Workspace Essential
This is where operational visibility lives. This layer focuses light exactly where the “blade meets the board.” Under-cabinet LEDs are the gold standard here, but the placement of your ceiling fixtures also plays a role.
-
Placement Insight: Position your perimeter recessed lights directly over the edge of the countertop, not in the middle of the aisle. If the light is behind you, you’re working in your own shadow.
3. Accent and Decorative Lighting
This is the “jewelry” of the kitchen. Think of glass-front cabinet lights or those beautiful pendants over the island. While they provide some light, their primary job is to create depth and highlight your kitchen’s best assets.
The Technical “Triple Threat”: Lumens, Kelvins, and CRI
When you walk into a big-box hardware store, the lighting aisle is a nightmare of confusing numbers. After a decade in the field, I’ve boiled it down to three specs you absolutely must get right for a high-efficiency kitchen ceiling light integration.
Lumens (Brightness)
Stop looking at Watts; that’s just how much power the bulb sucks up. Look at Lumens. For a kitchen, you want a high-output environment.
-
Total Kitchen Goal: 5,000 to 10,000 lumens total (depending on room size).
-
Per Task Area: You want about 450 lumens per linear foot of workspace.
Color Temperature (Kelvin)
This is the “warmth” or “coolness” of the light.
-
2700K – 3000K (Warm White): Great for living rooms, but makes a kitchen feel “muddy” and sleepy.
-
3500K – 4100K (Neutral/Cool White): The “Sweet Spot.” This mimics daylight and makes food look fresh and vibrant.
-
5000K+ (Daylight): Too blue. Unless you want your kitchen to look like a high-security laboratory, avoid this.
CRI (Color Rendering Index)
This is the most overlooked stat. CRI measures how accurately a light source reveals the true colors of objects.
-
Expert Advice: Only buy bulbs or fixtures with a CRI of 90 or higher. In a kitchen, you need to see the difference between a perfectly seared steak and a burnt one. Low CRI lighting makes everything look grey and unappetizing.
Hidden Warning: Cheap LED “Value Packs” often have a CRI of 80 or lower. They might be bright, but they will make your expensive blue cabinets look like a sickly shade of green.
High-Efficiency Integration: Smart Controls and Dimmers
If you aren’t installing dimmers, you are failing your kitchen. A kitchen is a multi-purpose room; it’s a high-intensity workspace at 6:00 PM and a cozy dining area at 8:00 PM.
Pulse-Width Modulation (PWM) dimming in modern LED fixtures allows you to reduce light output without that annoying flickering. By integrating smart dimmers, you can program “scenes.”
-
“Prep Mode”: All lights at 100% for maximum visibility.
-
“Dinner Mode”: Pendants at 50%, task lights off, ambient lights at 20%.
Common Installation Pitfalls (And How to Avoid Them)
Over the years, I’ve been called to “fix” countless DIY lighting jobs. Here are the three most common blunders:
-
The “Airport Runway” Effect: Placing recessed lights in a perfectly straight line down the middle of the room. It looks clinical and leaves the actual workspaces dark. Always align lights with the work surfaces.
-
Ignoring Glare: If you have high-gloss countertops (like polished granite), a bright kitchen ceiling light can create a blinding reflection. Use “baffled” trims on your recessed lights to deeply seat the bulb and hide the direct glare from your eyes.
-
Mixing Color Temperatures: Never mix a 3000K bulb with a 5000K bulb in the same room. It creates a visual “vibration” that causes headaches and makes the room look disorganized.
The Future of Operational Visibility: Tunable White LEDs
If you’re at the “intermediate” level and looking to future-proof your home, look into Tunable White Technology. These fixtures allow you to change the Kelvin temperature throughout the day.
Imagine your kitchen lights starting at a crisp 4000K in the morning to wake you up, then automatically shifting to a soft 2700K in the evening to help your body produce melatonin. This isn’t just “home improvement”—it’s biological optimization.
A high-efficiency kitchen ceiling light plan is the difference between a room you “suffer through” and a room you “command.” By layering your light, prioritizing high CRI, and ensuring your Kelvin temperatures are consistent, you transform your kitchen into a high-performance studio.
Don’t let your beautiful kitchen stay in the dark. It’s time to stop squinting and start seeing your culinary workspace for what it truly is: the heart of your home.
Are you planning a kitchen refresh or a full-scale renovation? I’d love to help you dial in your lighting plan. Would you like me to calculate the specific lumen requirements for your kitchen’s square footage?